
Dear Santa, I've Been Good. Please Notice My Earrings.
DIY Christmas ornament earrings.
Grab your coffee, pull up a chair, and prepare yourself for the grand finale of my Dollarama Made Me Do It! craft adventure.
I've saved this little project for last because, quite frankly, I think these earrings are adorable. Absolutely show-stopping!
Well, for the staff Christmas party, anyway.
Which, considering I'm the entire staff here at The Paper Artist, could be a rather intimate gathering.
Attendance: One.
Refreshments: Coffee.
Entertainment: Me, admiring my own earrings.
And honestly, I've been to worse parties.
You See Christmas Decorations. I See Earrings!
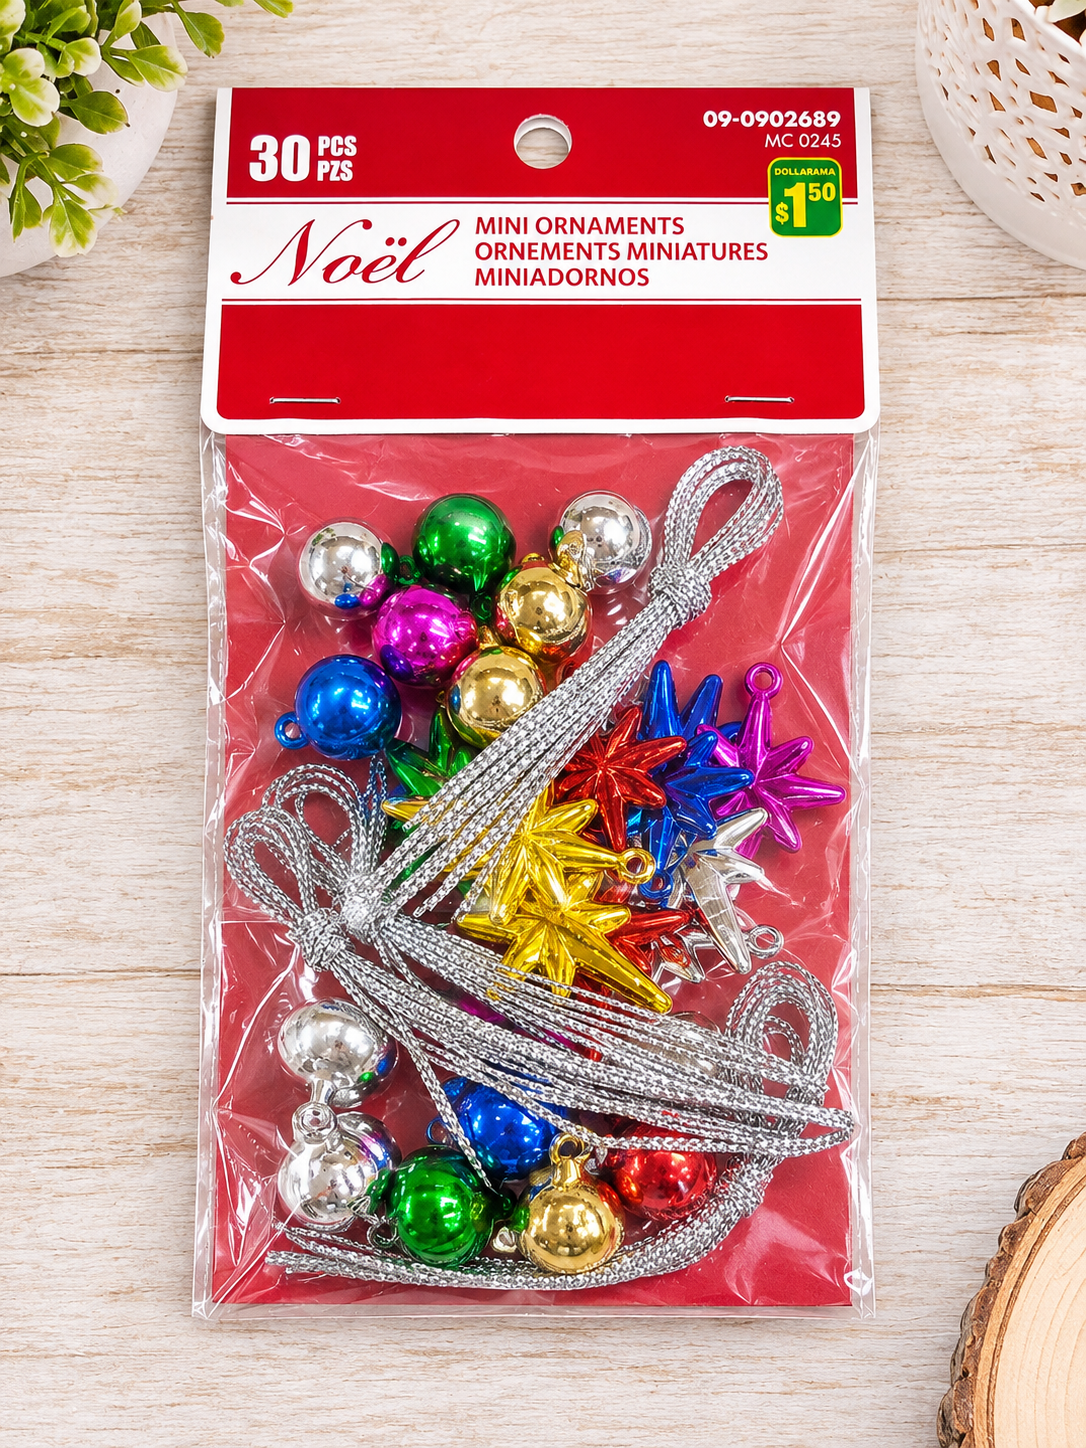
Remember that $10 Dollarama craft haul I brought home a couple of weeks ago? Four inexpensive purchases, four little crafting experiments, and absolutely no guarantee that any of them would turn out to be worth the money.
One of those purchases was a $1.50 package of miniature Christmas ornaments.
Thirty tiny decorations in assorted colors and shapes, complete with little silver hanging cords.
Perfectly lovely for decorating a miniature Christmas tree.
Except I didn't see Christmas tree decorations.
I saw earrings.
Not elegant, understated, wear-them-to-the-opera earrings.
Oh, no.
I'm talking about the kind of earrings you wear to the staff Christmas party with your festive sweater, possibly a pair of reindeer antlers, and enough Christmas spirit to make Santa himself question your enthusiasm.
You know the people I'm talking about.
Those people who do that kind of stuff.
And there are LOTS of us!
Dear Santa, I've Been Good. Please Notice My Earrings.
I started with two tiny, shiny red Christmas balls.
Now, technically, I could have attached each ornament directly to an earring hook with a jump ring and called it finished.
But that seemed a little plain.
I mean, it's CHRISTMAS!
Your earrings should be a beaming statement to Santa about how good you've been all year long!
And if your behavior hasn't been particularly exemplary, perhaps a little extra sparkle will distract him.
So I added some coordinating silver beads, including a lovely textured silver bead that catches the light beautifully.
A little extra detail, a little extra glitter, and suddenly those five-cent Christmas ornaments were looking rather fabulous.
Not bad for something originally intended to hang on a tiny Christmas tree!
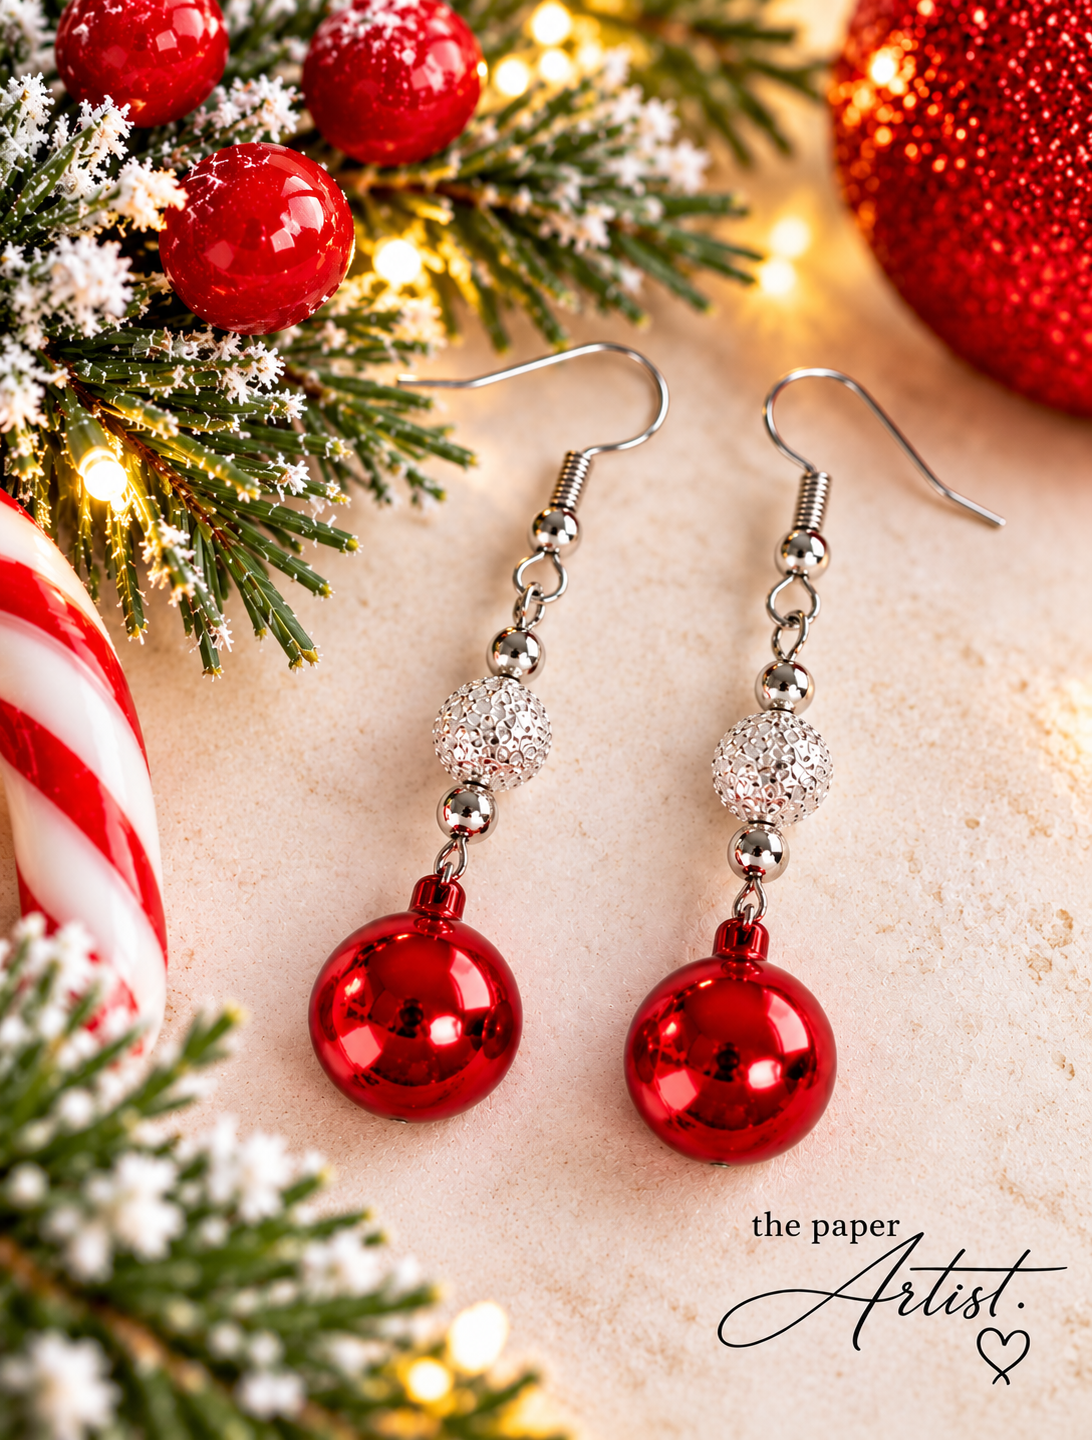
DIY Christmas ornament earrings.
You Won't Find These at Tiffany's
But you WILL find them on my craft desk.
And you know who I think would absolutely wear these earrings?
Alexis Carrington.
Oh, she would wear them, all right.
She'd sweep into the Christmas party wearing something outrageously expensive, toss her hair over one shoulder, and casually mention that her earrings came from Tiffany's.
And heaven help the poor soul who suggested otherwise.
Meanwhile, back here in the real world, I'm sitting at my craft desk with $1.50 worth of Dollarama Christmas decorations and a cup of coffee.
Same level of glamour.
Slightly different budget.
Money. Power. Christmas Baubles.
Somewhere, the Bead Dynasty continues.
A Few Things I Learned Along the Way
As with most of my crafting experiments, there were a few discoveries worth passing along.
1. A little extra detail makes a big difference.
Yes, you can attach an ornament directly to an earring hook. But adding coordinating beads can turn a simple novelty earring into something with a little more personality.
Try silver beads with red ornaments, gold with green, or whatever combination makes your Christmas-loving heart happy.
2. Check how many ornaments you actually have.
The package contains 30 miniature ornaments, but that doesn't mean you get 15 matching pairs.
Some colors have only two ornaments. Others have just one.
This becomes important when you're planning an entire Christmas jewelry ensemble.
Earrings, bracelet, perhaps a necklace.
Although, if you already own one of those battery-operated Christmas light necklaces, I suppose you're all set.
And if you're planning a complete matching collection, you might want to pick up more than one package.
Another trip to Dollarama.
How terribly unfortunate.
3. Check the ornament attachments.
These little decorations were designed for Christmas trees, not ears. Make sure the hanging loops are secure, the jump rings are properly closed, and the finished earrings aren't too heavy or uncomfortable.
Also check for rough edges or loose pieces before wearing them.
4. Make sure you have your jewelry findings before inspiration strikes.
This is the lesson I learned the hard way.
I had enough earring hooks to make this adorable pair, but then I ran out.
Which meant I had to go looking for more on Amazon.
And what did Amazon immediately suggest?
Polymer clay.
Because apparently the internet has decided I need ANOTHER hobby.
I went looking for earring hooks, people. Not a whole new creative identity!
What a rabbit hole this jewelry-making business has become.
Crafting Tip #347: Never underestimate the financial consequences of a $1.50 impulse purchase.
The Verdict: Was the $1.50 Worth It?
Absolutely!
For $1.50, I got 30 miniature ornaments with all sorts of possibilities.
They could become earrings, bracelet charms, necklace pendants, or even little embellishments for handmade gifts.
The colorful starburst ornaments are particularly tempting, although they'll have to wait until my supply of earring hooks has been replenished.
And that is what I enjoyed most about this experiment.
It wasn't about creating expensive jewelry or making something terribly sophisticated.
It was about looking at an ordinary little package of Christmas decorations and seeing something completely different.
Something playful.
Something festive.
Something that might make someone smile at the office Christmas party.
And for me, that's a crafting success.
And That's a Wrap on Dollarama Made Me Do It!
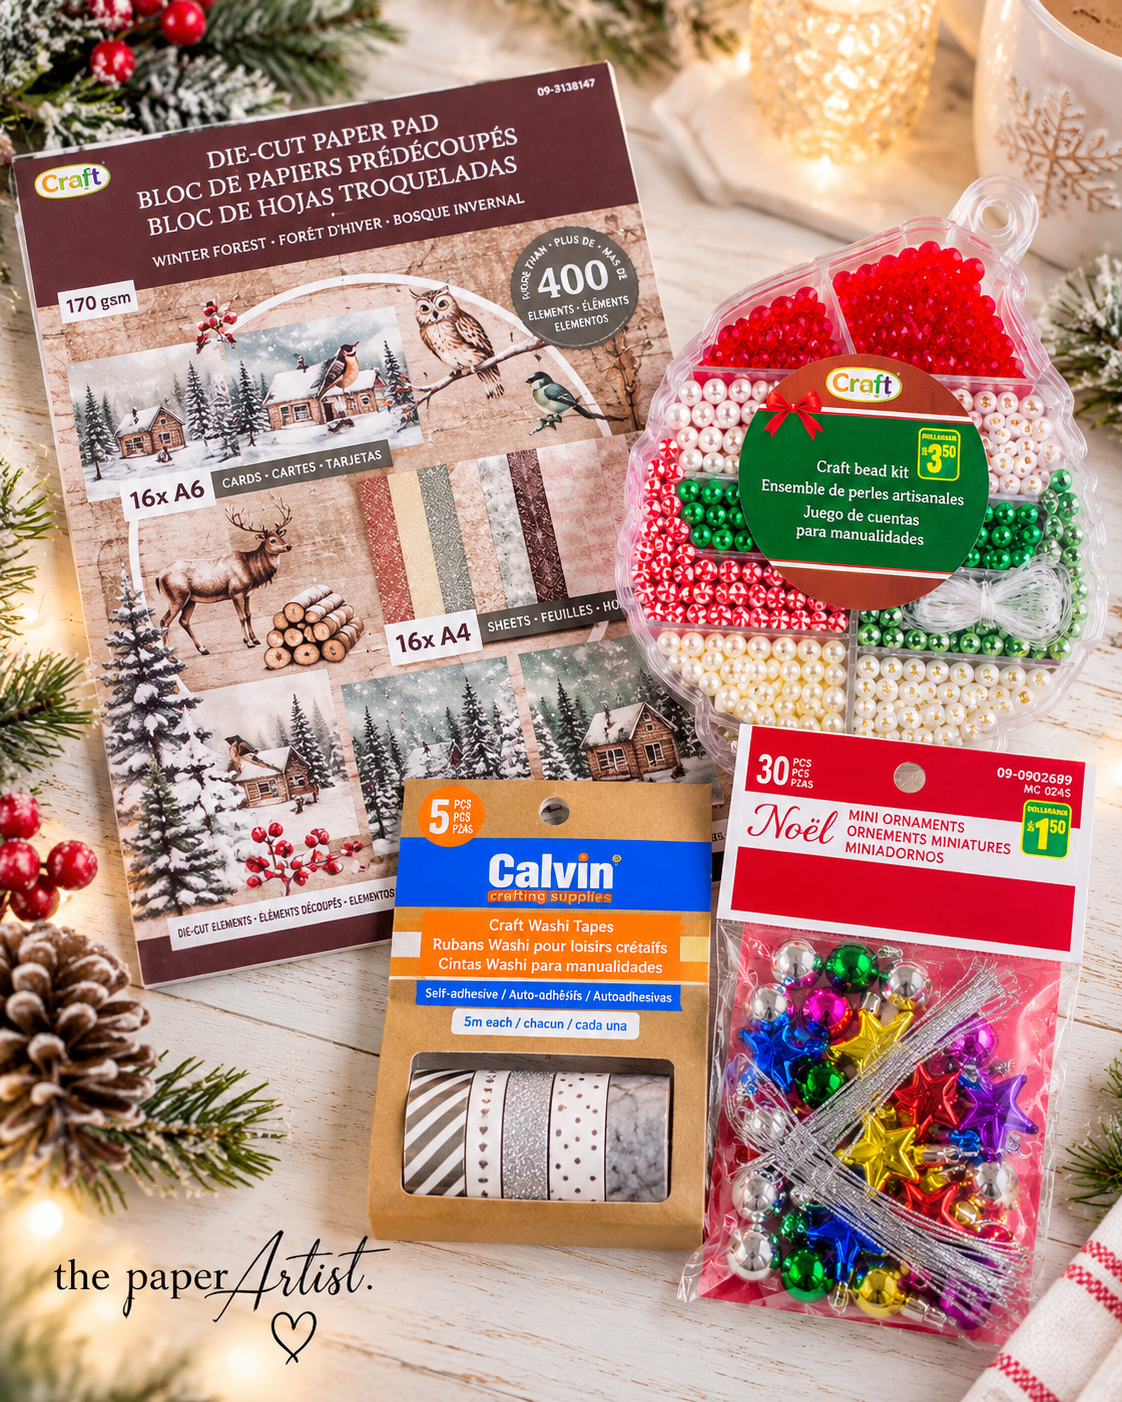
Four purchases. Ten dollars. Several crafting experiments.
We've played with pretty papers, tested washi tape, made bracelets from a Santa-shaped bead kit, and now turned miniature Christmas decorations into festive earrings.
Some purchases surprised me. Some inspired projects I hadn't originally planned. And all of them gave me an opportunity to try something different without spending a fortune.
That's what this little series was all about.
You don't always need expensive supplies to make something fun, useful, or beautiful.
Sometimes you just need a little imagination.
And occasionally, a complete disregard for what the product was originally intended to do.
Now, if you'll excuse me, I have a staff Christmas party to plan.
The guest list is complete, the earrings are fabulous, and I'm fairly certain the boss will approve of the dress code.
One final question: Would YOU wear these to your staff Christmas party?
Or are you more of a leave-the-decorations-on-the-tree kind of person?
No judgment here.
Alexis and I will be over by the coffee.
And whether Santa believes we've been good all year is an entirely different blog post.
Coffee in hand & something always on the craft table,
Julie — The Paper Artist ❤️
Missed the earlier Dollarama adventures? Catch up on the pretty papers, festive beads, and washi tape experiments before discovering how Christmas tree decorations ended up hanging from my ears!
Dollarama Winter Forest Die-Cut Paper Pad Review — A $3.50 paper pad with enough coordinating papers and die-cuts to create 25+ cards.
Dollarama Santa Bead Kit Review — Testing the $3.50 Santa-shaped bead kit and turning its contents into festive Christmas bracelets.
Dollarama Calvin Washi Tape Review — Putting the $1.50 five-pack of washi tape to the test and creating a handmade greeting card.
